yKeLh648

Saladmaster Changes Life

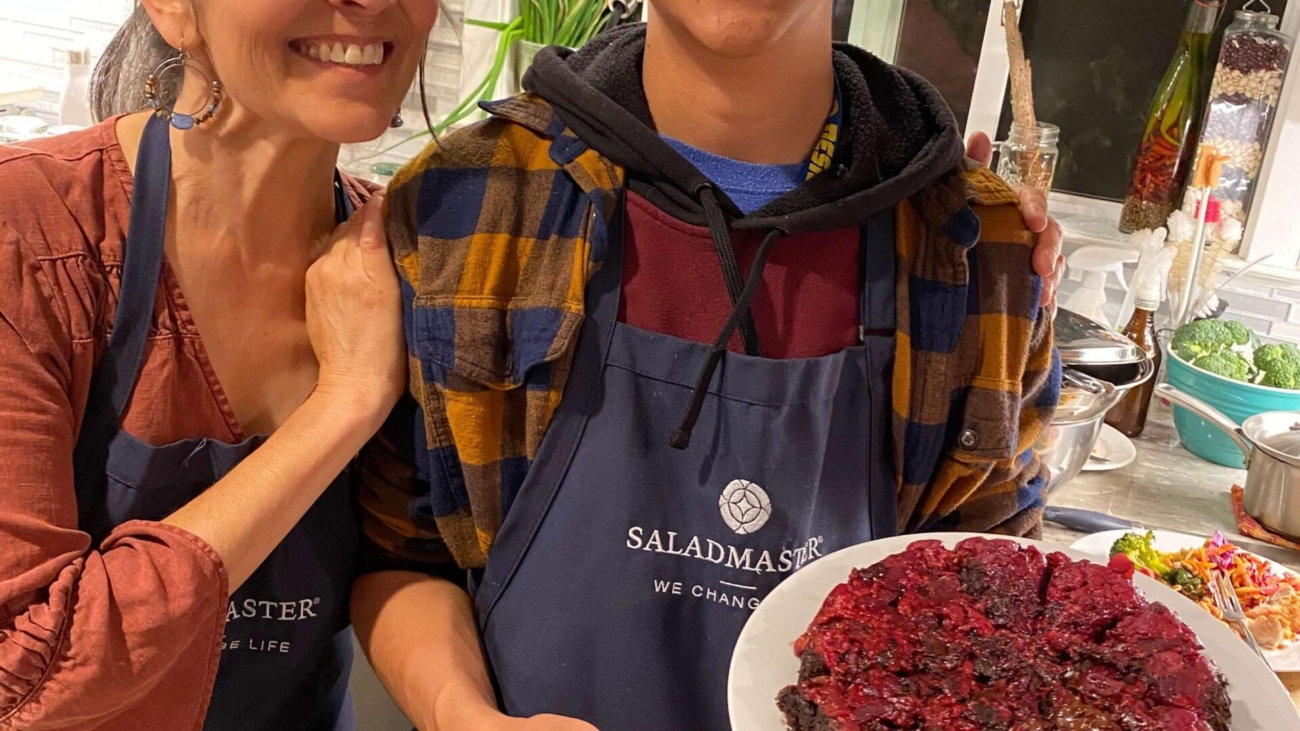
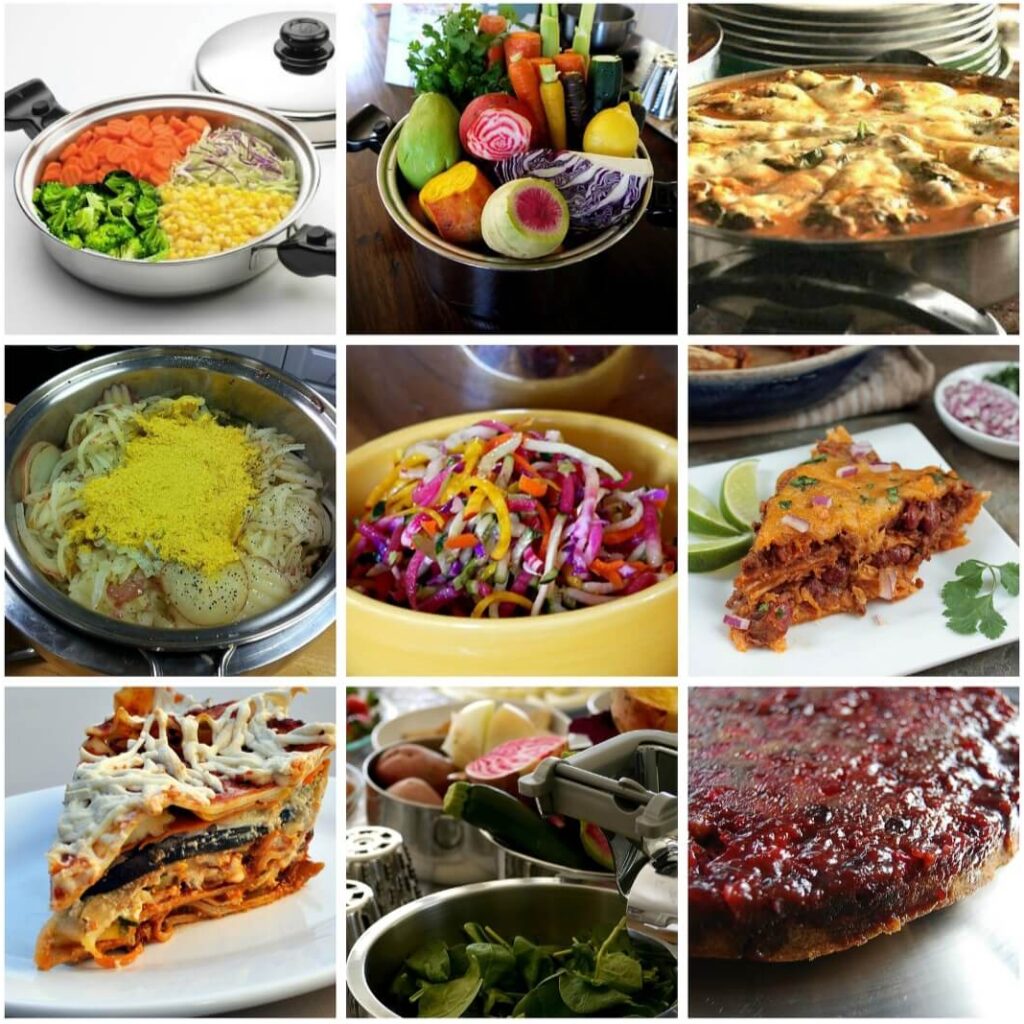
Lisa Zapata and her son Zack want you to be healthy and happy. To that end, they offer free product demonstration parties at which they prepare and then feed to the attendees a five-course vegan meal — using a set of cookware known as Saladmaster. The health benefits from the cookware are profound and equally profound is Lisa and Zack’s story. Catherine owns a few choice pieces and loves them. Thus, we are sharing this story about the Zapata family and Saladmaster with you, in advance of arguably the biggest cooking holidays of the year. Salud and Bon Appetit!

Lisa Zapata has always been passionate about food and nutrition. She is a teacher who has long specialized in sharing information that promotes health and wellness. She is also a widow. Her husband passed away in 2008 after a lengthy, protracted battle with cancer, as well as complications from treatment and the side effects of chemotherapy.

One day, just last year, a friend invited Lisa to attend a Saladmaster demo in her home. Lisa had seen the Saladmaster’s iconic product in action — a simple hand-crank food processor — several years ago at a health expo in San Mateo. She accepted the invitation to the demo and her whole life changed.

“I was blown away by the information presented,” Lisa recalls, adding, “They lure people in with the most delicious salad,” she laughs. “But there is so much more. The cookware, the technology, the healthy cooking surface, the way food retains its nutrients. I told my son, ‘I am so sorry I’ve been cooking on shoddy old cookware.’”

As Lisa says, that day, she “invested.” This word is not used lightly as the surgical-grade stainless steel with titanium cooking system carries a hefty price tag. Especially for a single mom. The full set costs in the thousands. “But, I told him, ‘We need to get this cookware, and we need to share this information with other people.’ Our family has had experience with illness and death, and we understand the importance of health.”

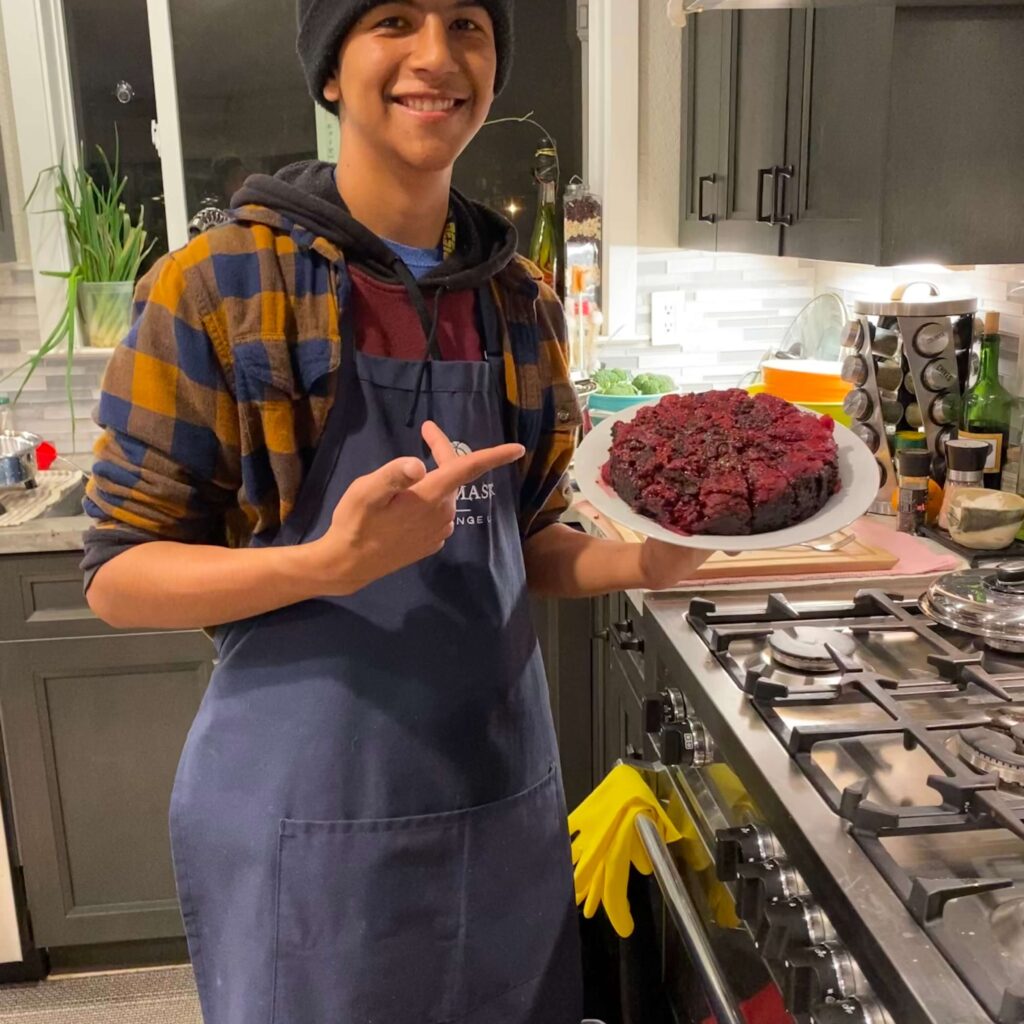
She was serious about the word “we.” Zack, age 16 at that time, immediately became her sous chef as Lisa embarked on her own cooking demos, in her and other people’s homes.

Her gentle nature, her teaching skills, her personal experience, and of course the compelling product, catapulted her to 7th place on the West Coast by the end of her first year as a sales representative with the company.

“Health is what I am about,” Lisa notes. “I was sharing Saladmaster with my friends and my community, like any product I come across that I want to recommend. In everything I do, I am all about getting the toxins out. And that’s what using Saladmaster cookware does for people.”

She is also quick to point out that the high price tag pays back, with dividends. Explaining that the system essentially replaces oven cooking with lower-heat stovetop cooking, a more energy-efficient mode. “With an oven, 70% of the heat escapes. On the stovetop, you retain that energy, and over time, there’s your savings! Also, we are basically destroying food’s nutrition when we do high-heat cooking. Now I understand that with low to medium heat, and letting food cook in a vacuum, not only does the food retain its nutrients, but the flavor is amazing, too. With other cookware modes, grilling, baking, boiling, stir-frying, the microwave, the Instant Pot, food retains only 2-to-35% of its nutritional value, on average. With Saladmaster, food retains an average of 93% of nutrients! And minus the metals that leach out of other types of cookware. I don’t feel compelled to buy all of the vitamins and supplements anymore because I’m getting what I need from my food.”

As for Zack, he loves the work experience, and he shares his mother’s passion for helping others.

Lisa says, “Sometimes when I feel like I might be burning out, my son says, ‘Remember why we are doing this, Mom. It’s for something greater. We are in it because we want to change lives.’”

The Zapatas are indeed part of a worldwide movement. “Saladmaster has been around for 75 years,” Lisa notes. “I have met people who have had their cooking systems for 30 years. It’s a global company, with sales in 67 countries. Their motto is ‘We change life.’ Not just lives. Your whole life. In my case, that has definitely been true.”

Lisa and Zack are available to perform in-home demos, including bringing all of the ingredients and cooking a full meal, for you and your friends (minimum of six singles or three couples). Call or text her for more information about hosting and to schedule: (510) 775-3798‬. NOTE: Mention Arana’s newsletter when you call and Lisa will add a free beveled spatula to your hosting gift.

Mountain Gate Ave

Restoring and Maintaining Home Exteriors: Stucco, Shingles, Siding, and Brick

Got Home? We’ve Got an Exterior Paint Process For It

The Bay Area sings in a chorus of varied genres of architecture. From Eichlers and Craftsman Bungalows to ornate Victorians, robust Colonials, and magical Storybook houses, each genre is unique. What makes a style remarkable is in part how it features a specific set of materials. Arana views any home we are invited to work with as a treasure. We combine artistry with craftsman utility to not only beautify but also to protect the home for the long term.

While many houses in the Bay Area are around 70-to-100 years old or more, that timeline is nothing compared to the thousands of years that castles built in Europe have stood. Coming in somewhere between that kind of longevity and what is available to us if we are thoughtful and caring with the tools and materials available to us today, we present this article describing how we handle the types of exteriors that make up the majority of homes of The Peoples of the Bay Area: Stucco, Shingle, Siding, and Brick.

STUCCO: This home exterior material is a personal favorite of mine because it is infinitely easy to maintain — which makes it more environmentally friendly as well, in our opinion. We see in the industry a rise in the use of “sustainable” products, but if these are not also long-lasting, and must be replaced 2-to-3 times more often, then to us, that product may not in fact good for the environment. Stucco (as long as it is applied to a home NOT built on a hill near an earthquake fault) can go 10-to-20 years without needing new paint. As long as there are no cracks left unsealed, you don’t have to do much to it. Open cracks can let water in and that allows rot to develop underneath. The downside of stucco is that a whole wall of your home might be rotting away inside the stucco and you might not know about it.

Our process for maintaining, restoring, and beautifying stucco: We scrape and sand any peeling paint. For any cracks, we open them up, check for water damage underneath, and re-patch them. We spot prime and only if necessary, fully prime the whole house. If your house has a pre-colored stucco that is being painted for the first time, we can expect that a lot of primer will be needed, as unpainted stucco gets “thirsty,” drying out as it ages.

Let’s talk about elastomeric (“terpolymer” paint) on stucco: While we understand that it has some desirable qualities, as it is useful for waterproofing or bridging small cracks, it is only effective under the right conditions. If your stucco is in bad shape, and/or if you already have years of paint build-up, elastomeric is not the right choice. It cannot replace necessary repairs and upkeep. And please do not rely on elastomeric to solve all of your waterproofing problems! Elastomeric is best used on new stucco. If used on previously painted stucco, it is important not to over-apply it; results may vary depending on the texture of the stucco. Our advice is to research very carefully before you choose this product.

SHINGLES: Cedar shingles are not the most common material, but you will see them on homes across the Bay Area. Cedar is an amazing and versatile wood product, but it can become susceptible to breakdown in a shingle format. Varying approaches may be taken on how to treat them.

New shingles: Some homeowners choose to let the shingles stay raw and cure in the sun, causing them to turn gray. While this is a viable approach, we recommend at least that you have a clear sealer with a UV protectant applied to will help to protect the shingles from sun damage over the long term. This coating should be reapplied about every 5 years.

Cedar shingles that have been coated with a semi-transparent stain product: Over time, stained shingles develop tannin spots and will go grey or even totally black. To maintain a specific color and appearance we recommend using a wood brightener product that can be sprayed on and then gently scrubbed into the shingles with a stiff-bristle nylon or utility brush. Scrubbing enables the product to penetrate and remove the tannin stains as well as other types of mildew and grime.

The shingles should then be rinsed with a pressure washer (professionals-only, please). Once the shingles are nice and clean, we apply our favorite stain product: Messmers. Whether clear or one of their stock colors, we highly recommend Messmers as it results in a beautiful and long-lasting finish. NOTE: It is best to hold off on repainting the painted-wood elements around the shingles until after this process is completed, as any accidental contact from the wood-brightener product can mar a newly painted surface.

Cedar shingles that have been coated with a semi-solid or solid stain product: These types of stain products can partially or fully obscure the grain pattern of the wood. These products are used to achieve a color rather than enabling a proper marriage between color and wood grain. Any stain will fade over time, but with these types of products, you may also see peeling, flaking, or scratches — that become unsightly more than anything. Again, cedar is a hardy wood that will not rot, but in a shingle format, it does tend to break down slowly over time. A good general pressure wash of semi- or solid-stained shingles and a reapplication of the stain product in a one- or two-coat process should suffice, depending on the original product used and the condition of the wood.

Painted Shingles: Yes, this is a thing and we consider it almost a last resort, or if you simply must have a fully painted shingle home. If you don’t already have painted shingles, don’t do it. The amount of maintenance painting shingles can create is unpredictable, with each shingle potentially becoming a peeling-paint mess. To prepare and repaint this type of home, we would use the same process for painted shingles as for siding (see below). Another option is to replace your cedar shingles with HardieShingle® siding which is a fiber-cement product that is gaining in popularity.

SIDING: There are different varieties of siding your home can be built with. The original redwood of the SF Bay Area, cedar, pine or Douglas fir, or vinyl, or HardiePlank® Lap Siding which is a fiber-cement product that we are seeing on newly-constructed homes. HardiePlank is a pre-colored product that can later be painted when you are ready for a change.

Our process for painted siding, as with any painted surface: Scrape and sand any loose or peeling material. On wood surfaces, rot may need to be repaired or replaced. Repairs on damage to wood siding can only be done on areas that are no bigger than 4” x 4”. For these, we scrape out the rotted wood, apply a liquid that kills the dry rot organism, and then apply a two-part resin product that fills in the gap. We then apply a full coat of primer to those repairs and to the whole exterior of the home as needed. Next, we go over the entire surface area to inspect and caulk open gaps, in order to create a paintable surface.

BRICK: Brick homes are rarer in earthquake-prone California, but they are here, and we do work on them. Oftentimes bricks can absorb dirt and accumulate mold and mildew which can make them look drab. We recommend a careful pressure wash and scrub to brighten the bricks. Like any concrete or stone product, brick can erode over time and lose its shape. We recommend a clear sealer to prevent this. One that we use is Drylock. If you are going to go DIY with this product, please be sure to get it in a flat finish because shiny is no bueno on bricks!

Jeff & Sio-172-2-Edit-Edit

10 Things to Consider When Choosing Paint Colors for Your Interiors

By Judy Dinkle, Interior Designer and Color Consultant

Interior Designer Judy Dinkle is one of Arana’s go-to color consultants for our clients. As part of the service we provide, we include a free one-hour paint color consultation for whole-house interior or whole-house exterior contracts. We asked Judy to give us some pointers that we could pass along to our community; things to keep in mind when selecting paint colors for your home.

Judy says:

  1. Choose right the first time. Paint may not be that expensive, but labor costs can add up. Choosing colors carefully at the start of a project will save you time, and money, later on.
  2. Follow the “Rule of Three.” To give your room a sense of depth and a feeling of being thoughtfully designed, choose three colors that work well together for your wall color, accent color, and secondary accent color.
  3. Be bold. Often, I find that homeowners are afraid of being too bold, or of choosing colors that are too personal. I recommend choosing colors you will love living in. Your spaces will be more welcoming and authentic as a result. If your favorite color is red, paint a room red! Or choose an accent area to paint red, and add red pillows. The truth is, any color can look good if it is properly integrated into the palette of the home.
  4. Look in your closet for inspiration. When I ask my clients, “What would you like?” and they just don’t know — I ask them to show me their closet. The colors that are in your closet tend to be what you naturally gravitate towards and look good in. The spaces in your home should feel good and flatter you in the same way.
  5. Pick a color from your favorite BIG things. Another way to get your color cues is to look to the strongest and largest pattern in a room. Begin with a beloved piece of furniture or a rug, a stone countertop, carpeting or wood floors, one visually striking item that is very large in the space. Pick a color from that piece or pattern and start from there. That might be your wall color, or you might choose a more neutral wall color that compliments it, for example, a shade of white or ecru.
  6. Pair colors to enhance the energy of the space. In general, pairing colors that are adjacent to each other on the color wheel enhances the mood they project. Pairing cool colors such as blue and green in a room will lead to a more casual or relaxing feel that will work best in your informal and private spaces, like the bedroom. Reds and oranges together are warm and energizing — good for places where you want a lift such as a laundry area, entry, mudroom, or a home office or workout space.
  7. Skip the beige, or give it life. People tend to like beige because it’s safe. But it’s also pretty blah. If you want to do neutral well, the trick is to contrast cool and warm tones. For example, a warm beige-y-wheat paired with a cool gray can create a little tension that is more interesting to look at than if you chose all shades of the same neutral tone.
  8. Create a color strategy for the whole house. We don’t want every room to be the same color, but we do want all of the colors throughout the house to have flow. A red sofa in the living room might be echoed by a burgundy accent color in a bedroom. You might take a bright cabinet color like sea green in the kitchen and repeat it in the palette of an adjacent great room or dining room, in painted accents or in the pattern of the pillows or curtains, so that those spaces talk to each other.
  9. Go BIG in small spaces or places. Small spaces, like powder rooms, for example, can be a fun place to apply your boldest, brightest, deepest colors on the walls. While in general, painting a room white will make a tiny space look bigger, I like to give more power to a space by using bold color. Let your big rooms expand with the lighter tones and have the small spaces be more cocooned and impactful.
  10. Choose the right finishes. A good rule of thumb is to always do painted-wood trim in a furniture finish, like satin, rather than a semi-gloss; it looks richer. Sometimes I break this rule and choose to paint a door, wall panel, or divider screen in a high-gloss for drama and shine, however, the surface needs to be nearly flawless to begin with and the preparation of that surface also has to be perfect because high-gloss shows every imperfection. So choose wisely, (and hire a good painting contractor, of course).

Credits for images in this post:

PHOTO CREDIT: Garett Wisesan

PROJECT CREDITS: Painting Contractor: Arana Craftsman Painters; Color Consultant and Interior Designer: Judy Dinkle

Judy Dinkle of JD Designs is an award-winning interior designer located in the Bay Area. You are welcome to contact her directly about her color consulting and design services at [email protected] or 925-330-6774. Learn more about her work at www.houzz.com/pro/judydinkle/judy-dinkle-jd-designs

Great Room Judy Dinkle Houzz

Think Like an Interior Designer: More Tips on Choosing Colors for Your Home

By Judy Dinkle, Interior Designer and Color ConsultantJudy Dinkle headshot

(Part 2 of 2) Approaching a whole house interior painting project can easily feel overwhelming.

As an interior designer and as a color consultant working with Arana’s clients, I see this all the time. It’s why I do what I do, and why I am happy to help when Arana refers me for a project. Here are a few strategies I use to help guide clients to making the right decisions on paint colors for their homes.

Where to begin:

When faced with selecting a palette for your home, I recommend starting with the more public spaces, the living room, dining room, and entry. Once we find a palette we like for those areas, then the colors for the adjacent rooms end up jumping off from the main colors of the formal entertaining areas. Thus after the formal areas, choose related colors for the family room, primary bedroom, guest room, powder room, bath.

While it might be tempting to apply one palette of three colors throughout, if you paint the whole-house interior all the same, you will end up dulling down the impact of those colors.

How to make a room look thoughtfully put together:

If you want to think like an interior designer, try decorating from dark to light, vertically, in this order: floor, walls, trim, crown molding, casing, ceiling.

For example, if your floor is super dark, the walls might be a medium wheat gold, then the crown molding and casing around windows and doors might be a lighter tint of that or a warm white that picks up the warm tones of the gold, or you could choose a light gray wall color paired with a cool white with a touch of gray in it for the woodwork.

Designer Mark McCauley, says this “cookbook” method to color selection tends to work because it mirrors what we experience in nature: “Any interior space replicates the outside world. The exterior environment is generally darker below our feet (the earth itself), medium-valued as you look straight ahead (buildings/trees) and lighter skyward.”

When to paint it black?

Some designers have a rule to add a little bit of black in every room. This technique is very popular now, and I think it’s a good idea but I don’t automatically do this in every room. Still, it’s a tool that works. Black acts to clarify a room’s colors. The black could be the hardware on cabinets, it could be a faucet, a light fixture… also, you want to repeat it in a number of accents in the room to help create balance.

Accents like this are like adding jewelry to a perfect outfit. Sometimes I like to use black on a painted floor register or heating vent, especially with older houses that might have vent covers that are very decorative. I might find a place to repeat that pattern elsewhere in the room, also. Other opportunities for black include the stove hood in the kitchen, older light fixtures, door handles.

Other accents that many people may not realize are paintable include brick fireplace surrounds or even the treads and risers on a staircase! Paired with a nice runner, a painted stair system can look fabulous.

When to paint it gray?

In general, like black, a good gray also is a neutral you can use to accent space and pull things together from one room to another. Gray is also popular now. I advise caution; despite what you see in the magazines, I say do NOT do ALL light gray and white. Rooms still need color: pops, accents, artwork, graphic patterns on sheets or towels, an accent wall.

Gray is a great supporting player. Gray’s chameleon-like quality invites other colors to appear either warm or cool depending on the tone of gray you choose, and grays can pair beautifully with both pastels or stronger colors like hot pink, Kelly green, or citrusy shades.

Still stuck? Consider timeless pairings:

Still not sure where to begin? Consider timeless pairings to help choose a palette: start with black and white, or blue and white. Try this in a bathroom and then accent with metallic, copper, brushed bronze, or brushed brass. The metallic will balance the contrasting colors and make your space look more thought out.

You are welcome to contact Judy Dinkle directly about her color consulting and design services at [email protected] or 925-330-6774. Learn more about her work at www.houzz.com/pro/judydinkle/judy-dinkle-jd-designs

Oakland painters Arana Craftsman Painters

What Is Pantone’s Color of the Year?

What is the color of the year and why is it relevant? Is there just one? Under the heading of nothing is as simple as it sounds, there are multiple answers to these questions. Color of the Year, as announced by the Pantone company annually in December, is a relatively new phenomenon that began in the year 2000.

The Pantone announcement doesn’t just relate to house painting, but rather is an analysis of past color trends in industries including fashion, marketing, and business, as well as the mood of the culture, influences in the environment, for products and design, and a prediction (although some would say, this announcement drives the market) of what color will be relevant for the following year.

This annual event originated as a way to generate excitement about color. And the paint companies soon followed suit, announcing their own colors of the year. Basically, it’s all about marketing and P.R. But it’s also A LOT of fun to witness the reveals.

We also want to direct you to herein to projects in our portfolio that are similar to the selections being highlighted by Sherwin Williams and Benjamin Moore this year.

Note that the paint company colors tend to have almost no relation to Pantone’s announcement, visually, but rather are relevant to what has been trending in the design industry, specifically. Pantone’s color choice tends to have a direct bearing on consumer goods and fashion, including what colors the iPhone will be available in, for each year.

We like to use the annual announcements as an opportunity to reflect on the jobs in our portfolio where that color has been successful for us in the past.

Sherwin Williams selected a shade of teal (“Agean Teal”) that is somewhat similar to this very popular kitchen cabinet project, color specification and interior design by LMB Interiors: Hillsborough Kitchen Remodel

And Benjamin Moore’s “Urbane Bronze” is quite close to the colors famed designer John Wheatman selected for the exterior and basement of this august, North Berkeley home: Berkeley Basement Dig-Out

For our designer colleagues and for our homeowner clients, we see the annual announcement as a point of consideration — to explore the different feelings that the color might evoke, and a point of inspiration, an opportunity to make changes — as a professional retiring an old stand-by go-to color, or as a homeowner deciding to refresh a space.

Did you know? Arana puts together a book for interior designers each year about the paint companies’ announcements and the impact, which is available for download on our website in the resources section.

pantone-color-of-the-year-2021-for-fashion

Pantone’s Color(s) of the Year for 2021: Illuminating and Ultimate Gray

For 2021, for only the second time in its 20-year tradition of choosing the color of the year, Pantone selected a duo: gray and yellow. Their explanation is, as always, epic poetry:

“Ultimate Gray + Illuminating, two independent colors that highlight how different elements come together to support one another, best express the mood for Pantone Color of the Year 2021. Practical and rock-solid but at the same time warming and optimistic, the union of Ultimate Gray + Illuminating is one of strength and positivity. It is a story of color that encapsulates deeper feelings of thoughtfulness with the promise of something sunny and friendly.

“A message of happiness supported by fortitude, the combination of Ultimate Gray + Illuminating is aspirational and gives us hope. We need to feel that everything is going to get brighter – this is essential to the human spirit.

“As people look for ways to fortify themselves with energy, clarity, and hope to overcome the continuing uncertainty, spirited and emboldening shades satisfy our quest for vitality. Illuminating is a bright and cheerful yellow sparkling with vivacity, a warming yellow shade imbued with solar power. Ultimate Gray is emblematic of solid and dependable elements which are everlasting and provide a firm foundation. The colors of pebbles on the beach and natural elements whose weathered appearance highlights an ability to stand the test of time, Ultimate Gray quietly assures, encouraging feelings of composure, steadiness and resilience.

“Emboldening the spirit, the pairing of Ultimate Gray + Illuminating highlights our innate need to be seen, to be visible, to be recognized, to have our voices heard. A combination of color whose ties to insight, innovation and intuition, and respect for wisdom, experience, and intelligence inspires regeneration, pressing us forward toward new ways of thinking and concepts.”

From www.pantone.com

Shelter in Place, Part II: ADUs — Costs, options, and considerations

Continuing our conversation about Accessory Dwelling Units (ADUs), we asked Kevin Mond, head of design and sales for HDR Remodeling, as well as co-owner and vice president of the company, to describe in detail the process, costs, and range of options, to help our community make the best decisions for themselves. Arana has partnered with HDR on a number of projects, including the gorgeous custom-built ADU featured in this article.

Kevin writes:

Our company built our first ADU in 2015 and, from what we’ve seen, the rapid rise in requests for ADUs has been a fairly recent phenomenon. In the beginning, we were mostly working on garages, converting them into dwellings — this is a huge undertaking, especially when it comes to dealing with getting permits. Over the last five years, as the trend has continued upward, we’ve seen requests for ADUs vary quite a bit and we have found that there is simply not a one-size-fits-all reason or solution.

ADUs tend to fall into a few different categories. Some people simply want to generate rental income. They have space and want to invest in their property, but because it’s a rental, they prioritize doing the work as cost-effectively as possible, rather than focusing on quality. Those are not typically our clients since the high level of craftsmanship HDR Remodeling provides often comes at a higher price point.

Another category we see are couples whose parents will help them buy a house in the Bay Area, one on a big lot, with the condition or future goal of having the parents move into that ADU in retirement and be close to their children and grandchildren. We also see the case where parents own a large house and are willing to downsize and have the next generation take over the big house while the parents move into an ADU in the backyard.

A fourth reason is that people simply want to create additional space. Many of us in the Bay Area live in smaller homes; by adding more square footage in a separate part of the house or on the property, we can have that music studio, yoga studio, or home office (a huge Covid-19 need).

What excites me about ADUs is how creatively we have to think. It’s very different from designing a 2000-square-foot home.

For an ADU, you have to spend a lot of time analyzing every square foot, even every square inch — maximizing the layout so that the space feels larger than what it really is.

This challenge makes you rethink assumptions. You start asking questions like: Why does a bathroom need its own sink? If the kitchen sink can work just as well as your wash station, you can have one sink for the whole structure.

In one recent build, for a 250-square-foot ADU (click here to view photos in Arana’s portfolio) — which is very small — the clients didn’t have a specific need in mind, but they wanted flexibility. So, we installed a Murphy bed and a combined-use sink. This project also shows how the smallest details make a difference. For example, we took a mirror that they really liked, and instead of a simple surface-mount, we recessed it, just to avoid having it protrude from the wall. This helped make the space — which has a kitchen, bathroom, dining area, and bedroom — feel bigger. We vaulted the ceilings to make the interior feel larger than it really is.

There is a funny battle within ADU design. People love their backyards, but they also want the additional square footage of living space. Negotiating those competing desires is a dance we do so that we can provide enough square footage for each.

We also help clients decide if the trade-off is worth it. A backyard ADU may not always be the best choice; it depends on what you are trying to accomplish. If it’s a home office, a ground-up backyard ADU may not be the best route to go. It is costly to bring in electrical and plumbing and all of the systems required in a dwelling. In cases like this, installing a prefab structure might make more sense. If the homeowner doesn’t have a large backyard, building an attached ADU inside the home is sometimes an option. We recently completed a project in a standard 2-bedroom, 1-bath, 1200-1500 square foot, Oakland home, where we were able to dig down to achieve the required 8-foot ceiling height.

ADUs, especially ones with full plumbing and electrical, are often more expensive than people expect. For construction costs only, the budget can be around $350-$450K, and beyond. Even if you self-manage the project, construction costs can still end up being around $300- $400K, plus time spent project managing. And then you have to add in the costs for engineering, permitting, interior design, and furniture and decor. If there is room in the budget, I advise clients to prioritize using higher quality materials.

If instead of an ADU, you want to build a studio or an office in your backyard, that is much less costly. It’s a completely different permitting process and simpler to build. You are not excavating, bringing in plumbing, electrical, etc., or even having to pour a deep foundation. Because these structures are considered sheds, the foundation requirements are much simpler; you can do something very straightforward for about a third of the cost.

Another cost-cutting option, and one that also speeds up the process, is installing a prefabricated structure. For prefabricated dwellings, HDR recommends Abodu (abodu.com). We completed three Abodu installs for clients so far in 2020 and are finishing up two more, right now. For prefab sheds, a company we like is YardPods (yardpods.com).

People think, “I have a garage here, it’s kind-of falling apart, I’m 80% there, I just need to put some drywall and heat…” But that unfortunately is far from reality.

A garage built in the 1920s was built to store things, not people. To convert to a space where people live, the safety considerations go way up. You typically have to do additional framing, pour in a foundation, upgrade the siding to ensure that it’s waterproof, and make sure that the roof is in good shape. Plus you have to excavate and bring in proper systems, like plumbing and electrical. It doesn’t matter if the space is 200 square feet or 800 square feet, systems are where the costs go up.

A clear, upfront explanation of the cost is helpful because most people I talk to say ‘I thought ADUs would cost around $150K.’ There is a preconceived notion that smaller dwellings should cost far less to build than a larger structure. That’s why it is so important for us to educate the general public in order to assist in better upfront decision making. We appreciate the opportunity to reach Arana’s audience on this topic!

By Kevin Mond.

Learn more at: www.hdrremodeling.com

Central-Ave-Queen-Anne-Victorian-Blog

How Long Does Exterior House Paint Last?

Surface preparation, power washing, and getting the right contractor on the job are all things that should be taken into consideration when you are planning to paint your home. Your exterior paint is an investment. We are not speaking solely on a financial level here either. New paint helps with the aesthetics of your home, but most importantly it protects your home. It protects the building from moisture, bug invasion, and prolongs the life of the siding. These are all very important jobs which is why finding the right paint and contractor is important.

While we might have gotten off topic a bit, we thought it was important for you to realize the importance of your paint choices. How long does exterior house paint last? Well, that depends on a few factors such as the environment the paint is enduring. Also, the products used are important as well as the age of the home. A general rule of thumb though is that your paint job should last at least 5 years before you are looking at painting again. Some paints last longer.

While you are thinking about getting your house painted you should keep in mind that there are many types of paints out there. You should educate yourself and ask a contractor what they recommend for your dwelling. Not all paint is made for the very surface that your siding is made of. In fact, there was a time when we couldn’t paint vinyl siding for example. However, the painting industry has come a long way and now it is very possible and less costly than putting on all new siding.

Be sure that you choose a very good quality or premium paint. Now, this will be more costly but this paint is made to last and endure the elements.

What type of siding you have will determine the type of paint you will need. Some of these paints are more expensive than others. Paint for a wood sided house would be around $65 per gallon.

Invest in a good painting company.

Not all painting companies are the same. Take your time to look around for reviews and recommendations online. Ask around on social media about who people might recommend. It is important that you find a licensed and insured painting contractor that will show up and complete the job as requested. Be careful out there, there are a lot of companies that don’t care about their reputation. They will paint your home and have it looking great but in 2 years you find it starting to peel and prematurely aged. This is because they didn’t put forth the effort to surface prep as they should have.

The exterior of your home should be pressure washed, re-caulked, sanded, and sealed before new paint goes on. This are important steps that aren’t always done by painting contractors. They should take the time to scrape and sand on the surfaces that need it. If board replacement is necessary, they should address that as well. Surface prep is the most important step in the painting process and needs the most attention to detail. Without it your painting job won’t last long and you’ll have to do it all over again.

Exterior house painting in oakland

Tips For Hiring An Exterior House Painting Expert

You may be looking at your home and thinking about just how dull your once vibrant exterior has become. Don’t beat yourself up over it, it is actually a very common occurrence amongst homeowners. Years and even decades pass with very little, if any thought given to a home’s exterior paint.

You might also be staring at your home’s exterior, wondering what can be done to restore it. Of course there’s the do-it-yourself approach though this tends to be both expensive and produce results that range from lackluster to mediocre. Going it alone or even with help from friends and family is also incredibly time consuming and more so when you lack experience. The best option in this scenario is to hire a professional house painter. Before you balk at the cost of doing so consider all the time and money you’ll spend trying to do the job yourself. Once you have decided to hire one you’ll have a process in front of you and you’ll want to take great care in selecting the right painter.

Do Your Homework First
Long before you actually hire a painter to address the exterior needs of your home you will want to spend some time in front a computer researching candidates. It behooves you to look at reviews both on a painters website and those found on independent sites. This will begin to give you an idea of what a painters reputation is and what type of work they produce. In addition to reputation, you should consider speaking with others online who have used a specific painters service.

Interviewing Candidate Painters
Once you have a good idea of how a particular painter operates you can begin contacting prospective firms. Initiating contact via email works while speaking with them over the telephone is even better. Of course nothing beats meeting such persons/firms in person for some face time. No matter the manner of meeting, have your queries and project details ready. The more information you can give a painter the more they will be able to give back. Be sure to discuss budget and be open about ideas and desires you have. Lastly, at some point during your discussions you should ask for licensing and bonding information. Firms that operate without the aforementioned should be immediately disqualified.

Project Details
While scouting painters it is incredibly important to discuss the scope of your project as well as the reason for wanting to paint the exterior of your home. Moreover, find out who is responsible for clean up once the project is finished as not all painters address that themselves. Offer up your own ideas with regards to colors, patters, and placement. The greater the exchange of information, the better your home will look in the end and the more satisfied you will be.

Discussing Budget
While having your home painted can be an exciting venture, don’t let your imagination be bigger than your budget. By being open about what you have to spend a professional painter can formulate a plan that works. Alternatives to more expensive options are always present but usually aren’t the first ones explored by pros. Save time and hassle by being open and honest about what you can dedicate to your project.

Ask For References
Again…more homework. When speaking with a prospective painter do not hesitate to ask for references. Any professional worth their salt will not only be able to provide you with several but will be happy to do so as well. Any painter that beats around the bush or produces questionable references should be crossed of your list. When you do contact these references have a list of questions ready for them. Ask about cost, customer service, quality of work, speed of work, and ask about any problems they might have encountered etc.

Look For A Guarantee
Not all painters offer guarantees but those that do have confidence in the work they produce. Such painters should sit atop your short list of candidate hires. When speaking with firms or individuals dig deep for the details of their guarantees. Keep an eye out for those that include annual inspections and a “no cost” repair policy. These protect your investment and ensure that you get a painter that places an emphasis on quality and satisfaction.

For A Free Quote On Exterior House Painting in Oakland and Surrounding Areas Call 510-567-9559